Azure Entra SSO for TAP GUI via Keycloak

In recent years, I've worked with many customers who want to add SSO to a developer tool but run into blocking issues.
These are the two most common issues:
- there is no update-compatible way to configure Proxy configuration
- they want to use Technical Accounts, but they are not supported or allowed by their corporate SSO solution
Working with customers on Tanzu Application Platform(TAP)1, I often run into the first.
Tanzu Developer Portal2, the main GUI of TAP, is based on Backstage3 and the authentication is in Backstage is provided by adding plugins.
Many of these authentication plugins do not support configuring an outgoing Proxy other than changing the plugin's code.
This is not an acceptable solution for our customers.
This guide explores how we can leverage Keycloak4 to function as an authentication proxy.
Keycloak is an application for authentication and authorization federation (and more) that supports proxy configurations.
Keycloak is also built to run in Kubernetes, so it is an excellent solution to this problem.
As an identity provider, we use Azure Entra ID5, as this is a combination (TAP, Backstage, Azure Entra ID) that I've seen several times.
Note
You might be wondering what Azure Entra ID is.
Azure Active Directory, or AzureAD, has been rebranded as Entra ID.
Prerequisites
- TAP installation of either Full or View profile
- A Cert-manager ClusterIssuer
- Read the cert-manager docs6 to setup a ClusterIssuer
- And read my personal github pages7 on how to setup a CertificateAuthority
- Azure administrator account
- not sure if a Free account is valid, but Entra ID is free with regards to how this guide uses it
- Helm CLI
Steps
In this learning path, you will:
- Install Keycloak
- Configure TAP GUI Client in Keycloak
- Create App Registration in Entra (Azure AD)
- Configure Entra (Azure AD) in Keycloak
- Configure Keycloak OIDC in TAP GUI
Deploy Keycloak
We are going to deploy Keycloak via Helm charts.
As the customer might not be able to load Helm charts directly from the internet, we need a way to bring them in.
We will use the helm pull mechanism to download the OCI bundles and distribute them to the desired location.
Warning
The Bitnami Helm charts support overriding the repository from which the images come.
In this guide, we skip over the relocation of these images, but know you can do that:
Prepare
There isn't much to prepare here, so we stick to creating the keycloak Namespace.
Postgres Helm Chart
You might encounter the challenge of not being able to directly map the Helm Chart's Image repository to the internal one.
In that case, you must install the Postgres database separately from the Keycloak instance.
It also makes it easier to manage the Postgres instance, so we start with installing the Postgres Helm Chart9 from Bitnami.
First, we pull the Helm chart OCI bundle:
Then we create the install values (feel free to use a better password):
And then we install Postgres via the helm upgrade --install command:
helm upgrade --install postgres \
    postgresql-14.0.5.tgz \
    --values keycloak-postgres-values.yaml \
    --namespace keycloak
Let's see if everything is there:
If all is well, it should look like this:
NAME                                    TYPE                 DATA   AGE
secret/postgres-postgresql              Opaque               2      75s
secret/sh.helm.release.v1.postgres.v1   helm.sh/release.v1   1      76s

NAME                         DATA   AGE
configmap/kube-root-ca.crt   1      8m7s

NAME                             TYPE        CLUSTER-IP      EXTERNAL-IP   PORT(S)    AGE
service/postgres-postgresql      ClusterIP   10.96.177.191   <none>        5432/TCP   75s
service/postgres-postgresql-hl   ClusterIP   None            <none>        5432/TCP   75s

NAME                                   READY   AGE
statefulset.apps/postgres-postgresql   1/1     76s

NAME                        READY   STATUS    RESTARTS   AGE
pod/postgres-postgresql-0   1/1     Running   0          76s
Keycloak Proxy & Certificate
Keycloak requires TLS, so we generate a valid certificate (self-signed or not) by leveraging a ClusterIssuer named my-issuer.
Keycloak Helm Chart
Now install Keycloak.
We configure the Ingress, relying on the ClusterIssuer to generate a Certificate and populate the TLS secret.
We set the 'proxy: edge` values to get the front end to collaborate.
ingress:
  enabled: true
  ingressClassName: "contour"
  pathType: ImplementationSpecific
  hostname: keycloak.tap1.example.com
  tls: true
  annotations:
    cert-manager.io/cluster-issuer: my-issuer

proxy: edge

networkPolicy:
  enabled: true

auth:
  adminUser: keycloakadmin
  existingSecret: keycloak-credentials
  passwordSecretKey: password
service:
  type: ClusterIP
postgresql:
  enabled: false
externalDatabase:
  host: postgres-postgresql
  database: keycloak
  user: keycloak
  password: keycloak
Important
If you want Keycloak to use a proxy server, you can set these extraEnvVars as described in Keycloak documentation8.
As Keycloak is the external facing system and it can be pretty sensitive, I recommend using a separate secret for the admin credentials:
kubectl create secret generic keycloak-credentials \
  --from-literal=username="keycloakadmin" \
  --from-literal=password='InsertRandomGeneratedPassword' \
  --namespace keycloak
As with the Postgres database, we pull the Keycloak Helm Chart's OCI bundle.
With the bundle and the values file, we can install Keycloak:
helm upgrade --install keycloak \
    keycloak-18.3.0.tgz \
    --values keycloak-values.yaml \
    --namespace keycloak
The Ingres and its related resources should be valid:
And indeed they are:
NAME                                                                       READY   SECRET                                         AGE
certificate.cert-manager.io/keycloak.tap1.example.com-tls   True    keycloak.tap1.example.com-tls   1d

NAME                                                  TYPE                 DATA   AGE
secret/keycloak-admin-tls                             kubernetes.io/tls    3       1d
secret/keycloak-credentials                           Opaque               2       1d
secret/keycloak-externaldb                            Opaque               1       1d
secret/keycloak-tls                                   kubernetes.io/tls    3       1d
secret/keycloak.tap1.example.com-tls                  kubernetes.io/tls    3       1d
secret/postgres-postgresql                            Opaque               2       1d
secret/sh.helm.release.v1.keycloak.v1                 helm.sh/release.v1   1       1d
secret/sh.helm.release.v1.postgres.v1                 helm.sh/release.v1   1       1d

NAME                                 CLASS     HOSTS                                      ADDRESS          PORTS     AGE
ingress.networking.k8s.io/keycloak   contour   keycloak.tap1.example.com                  10.214.162.198   80, 443    1d
Let's look at the runtime resources:
NAME                          DATA   AGE
configmap/keycloak-env-vars   15      1d
configmap/kube-root-ca.crt    1       1d

NAME                             TYPE        CLUSTER-IP      EXTERNAL-IP   PORT(S)    AGE
service/keycloak                 ClusterIP   10.96.218.211   <none>        80/TCP      1d
service/keycloak-headless        ClusterIP   None            <none>        80/TCP      1d
service/postgres-postgresql      ClusterIP   10.96.177.191   <none>        5432/TCP    1d
service/postgres-postgresql-hl   ClusterIP   None            <none>        5432/TCP    1d

NAME                                   READY   AGE
statefulset.apps/keycloak              1/1      1d
statefulset.apps/postgres-postgresql   1/1      1d

NAME                        READY   STATUS    RESTARTS   AGE
pod/keycloak-0              1/1     Running   0           1d
pod/postgres-postgresql-0   1/1     Running   0           1d
All is well, and we can login to Keycloak now.
Configure Entra ID & Keycloak
Assuming Keycloak is working as intended, we can now configure the Keycloak < > Entra ID interaction.
Create App Registration in Entra
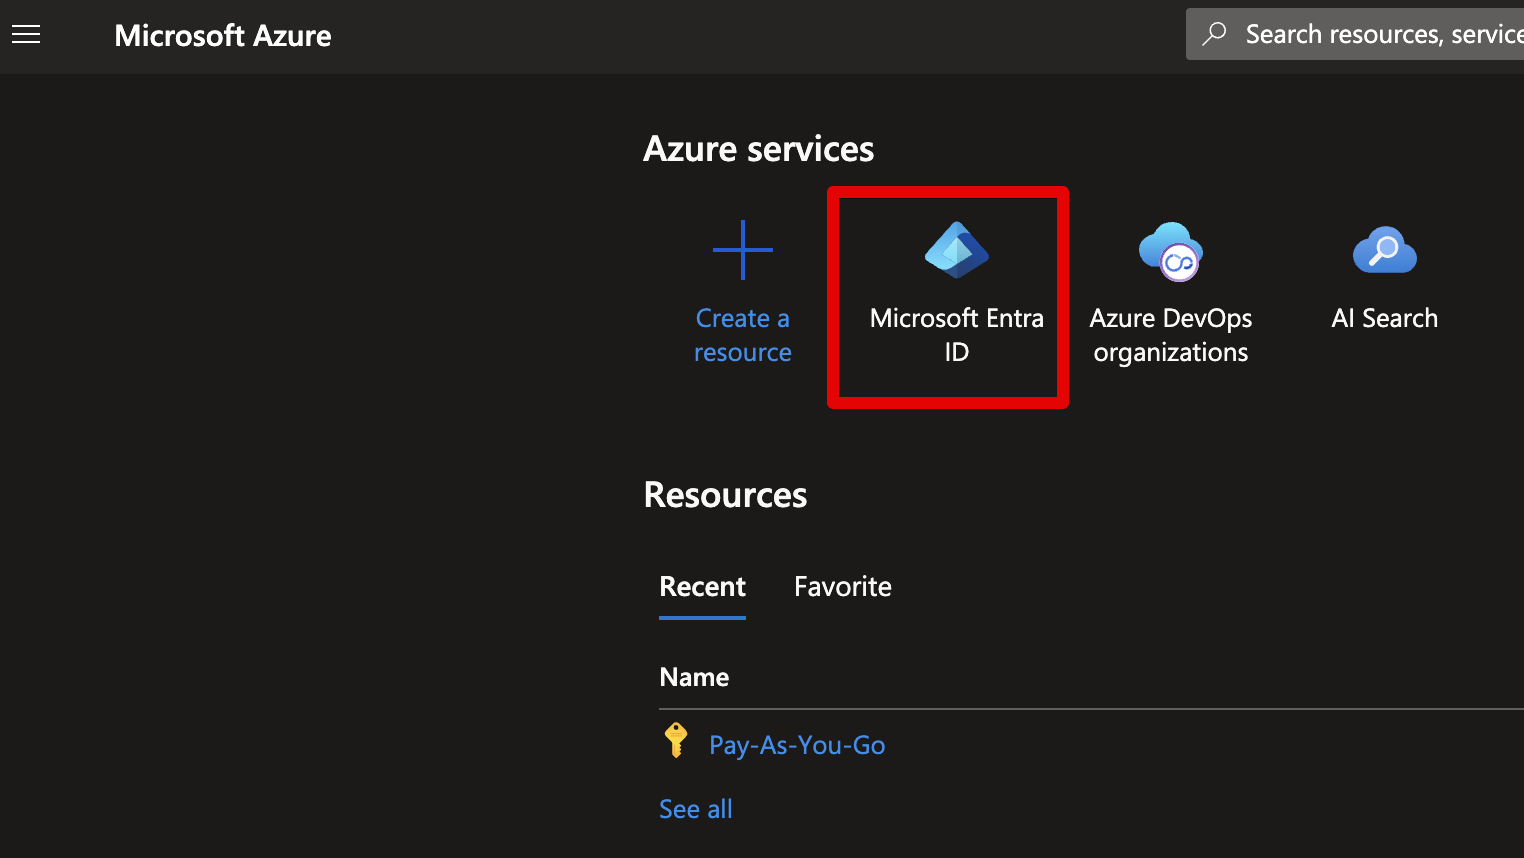
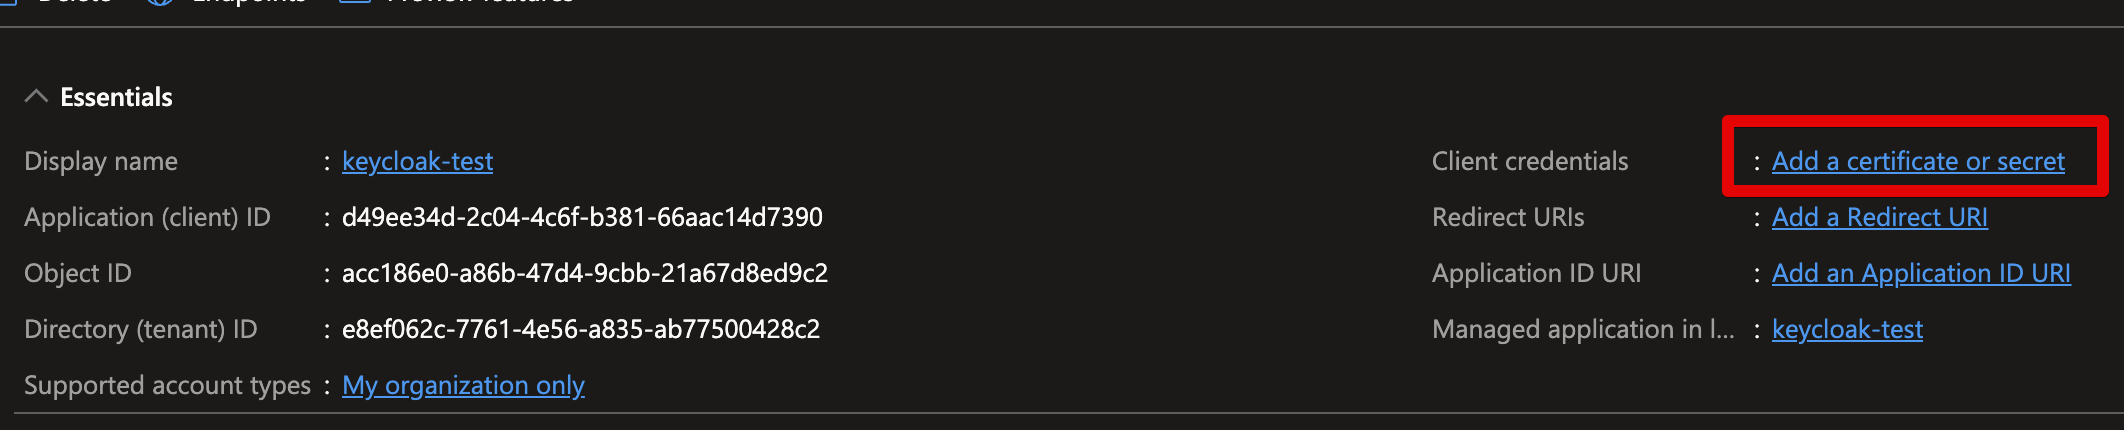
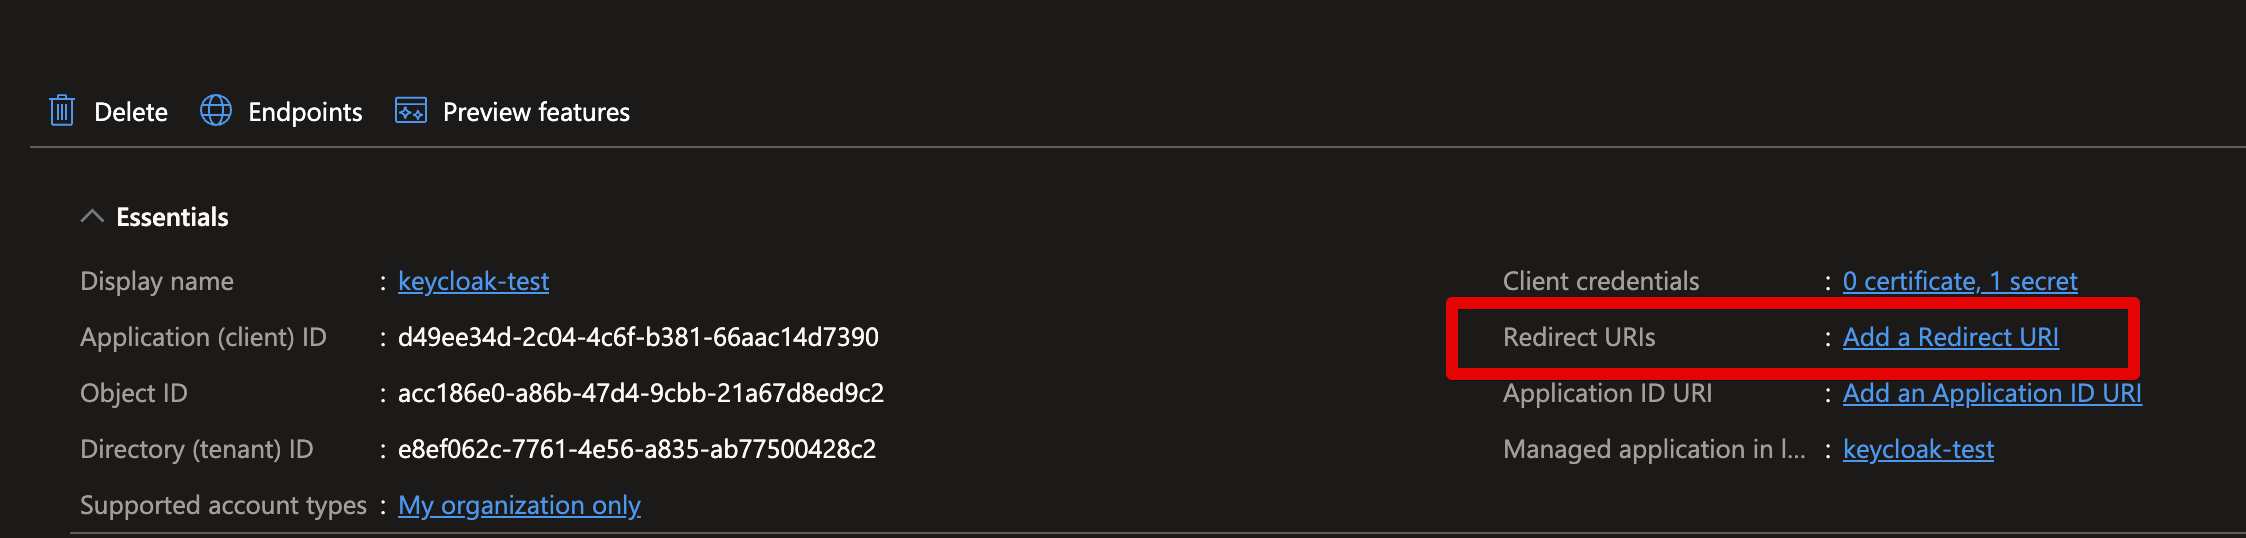
We start by logging into the Azure Portal and navigating to Entra ID.
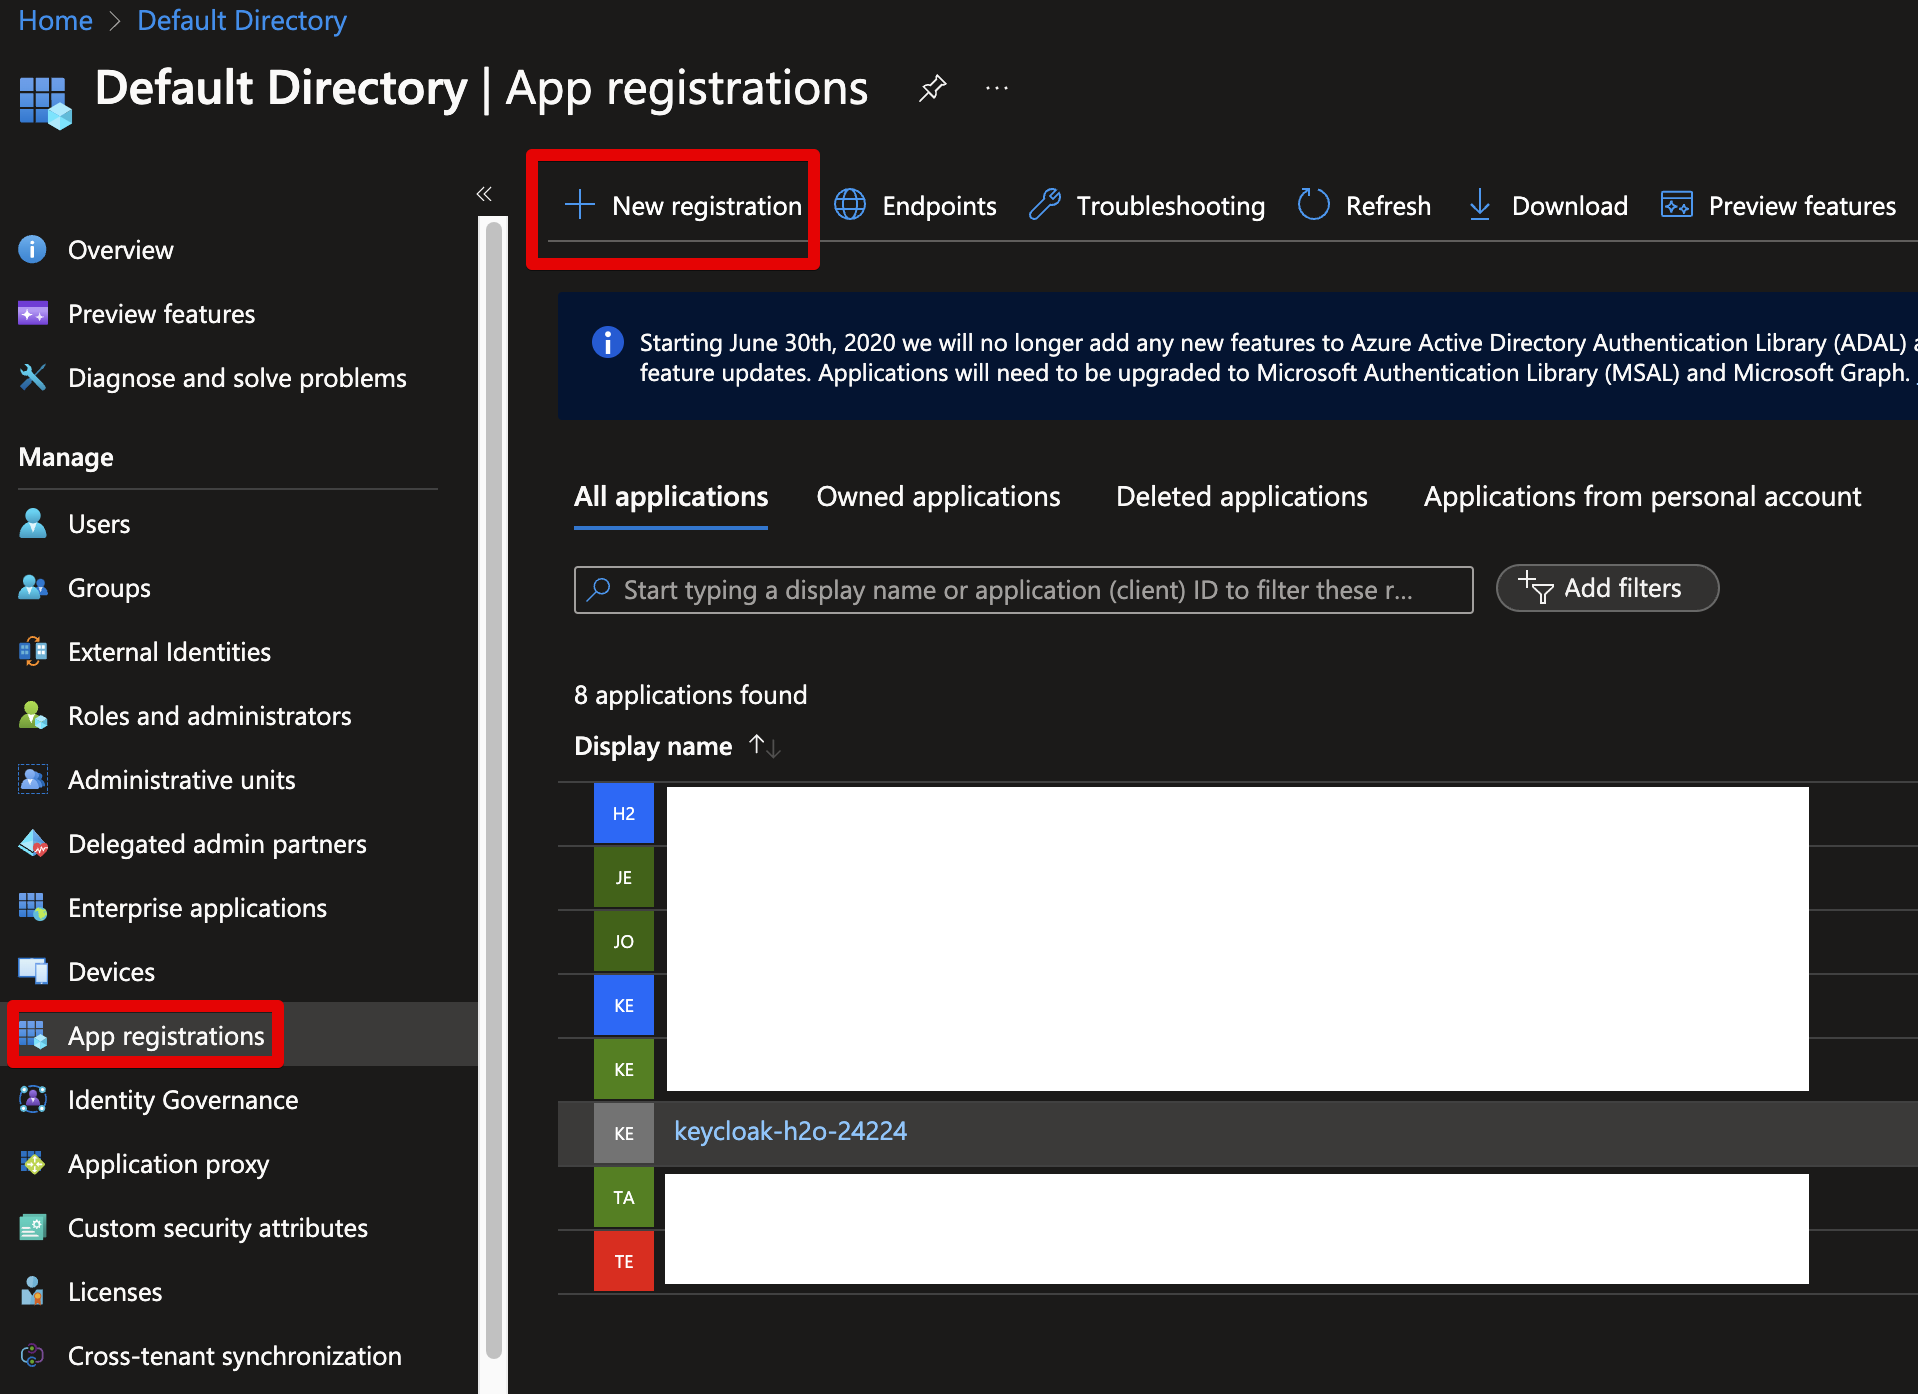
Open the App registrations menu, and select + New Registration:
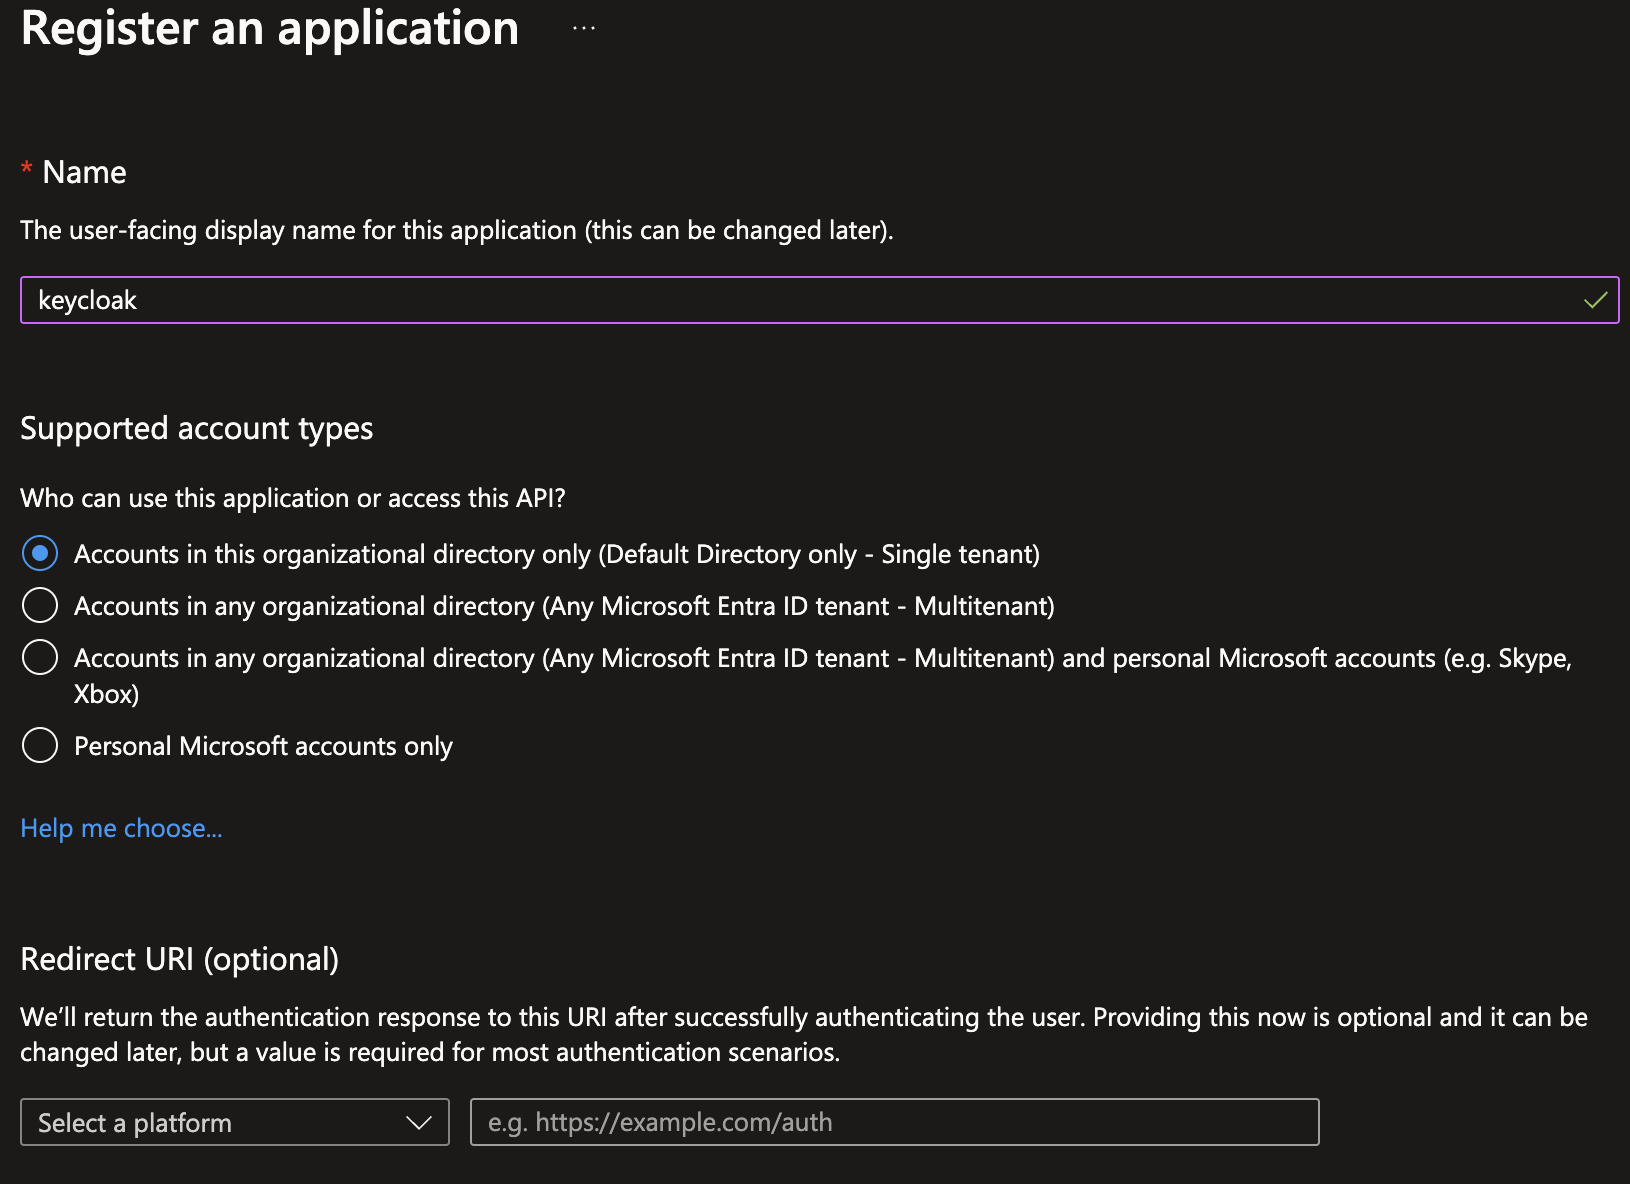
Then, in the creation process:
- Name: Give it a descriptive name, e.g.,
keycloak - Supported account types:
Accounts in this organizational directory only (Default Directory only - Single tenant) - Redirect URL: leave this blank for now
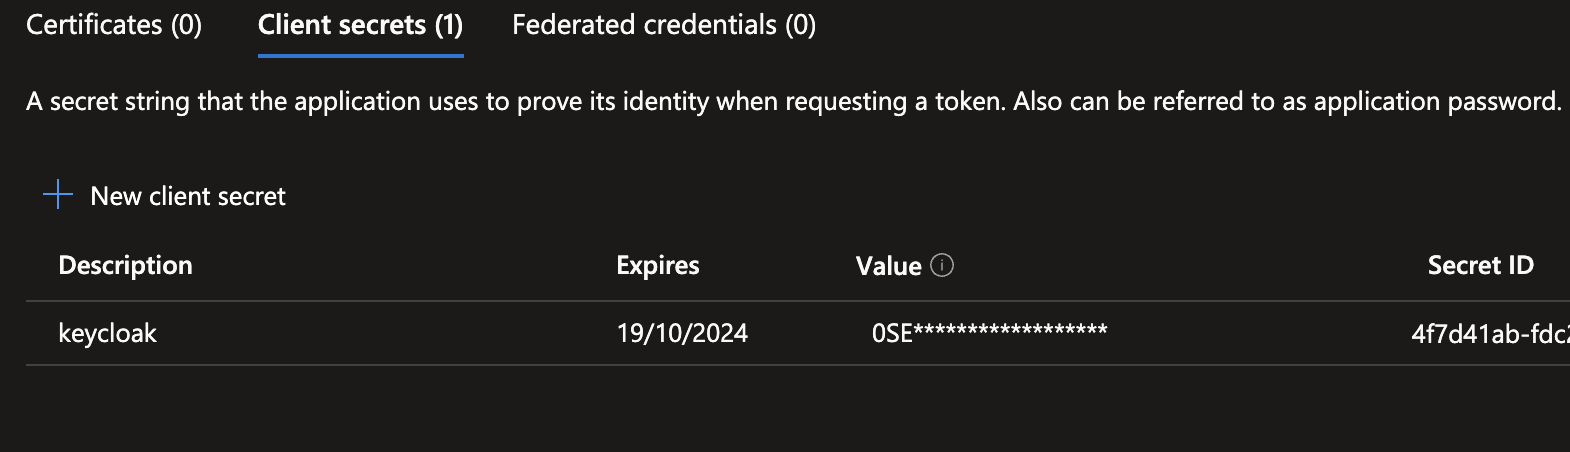
We then create a Client Secret by clicking on the Add a certificate or secret link after the Client credentials heading.
Click on New client secret, give a useful description, such as keycloak, set an expiration date, and hit Add.

Keep this page open, as we need the information in a moment.
Create Realm in Keycloak
Log in to Keycloak in a new tab so we can copy and paste values between Keycloak and Azure.
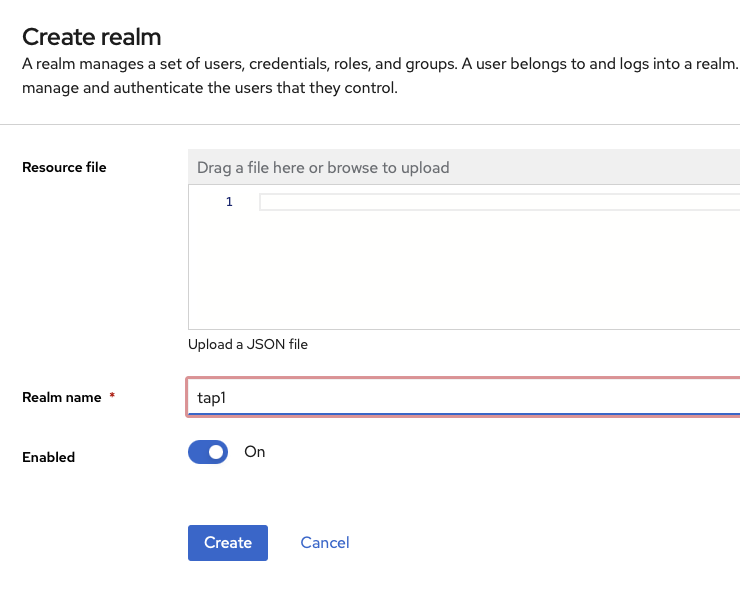
First, we create a Realm in Keycloak.
In the top left corner, there is a dropdown menu with the default (master); click on this and select Create realm.
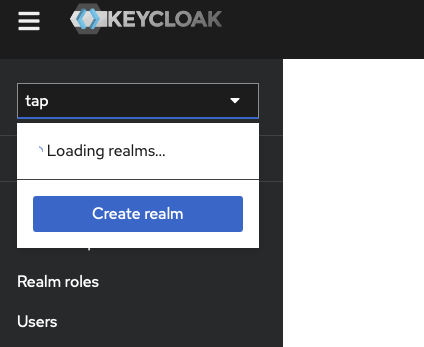
We name the realm tap.
Add Azure Entra as an Identity Provider
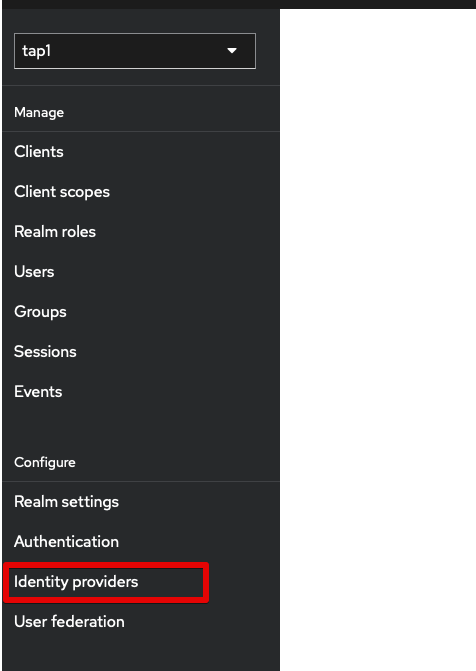
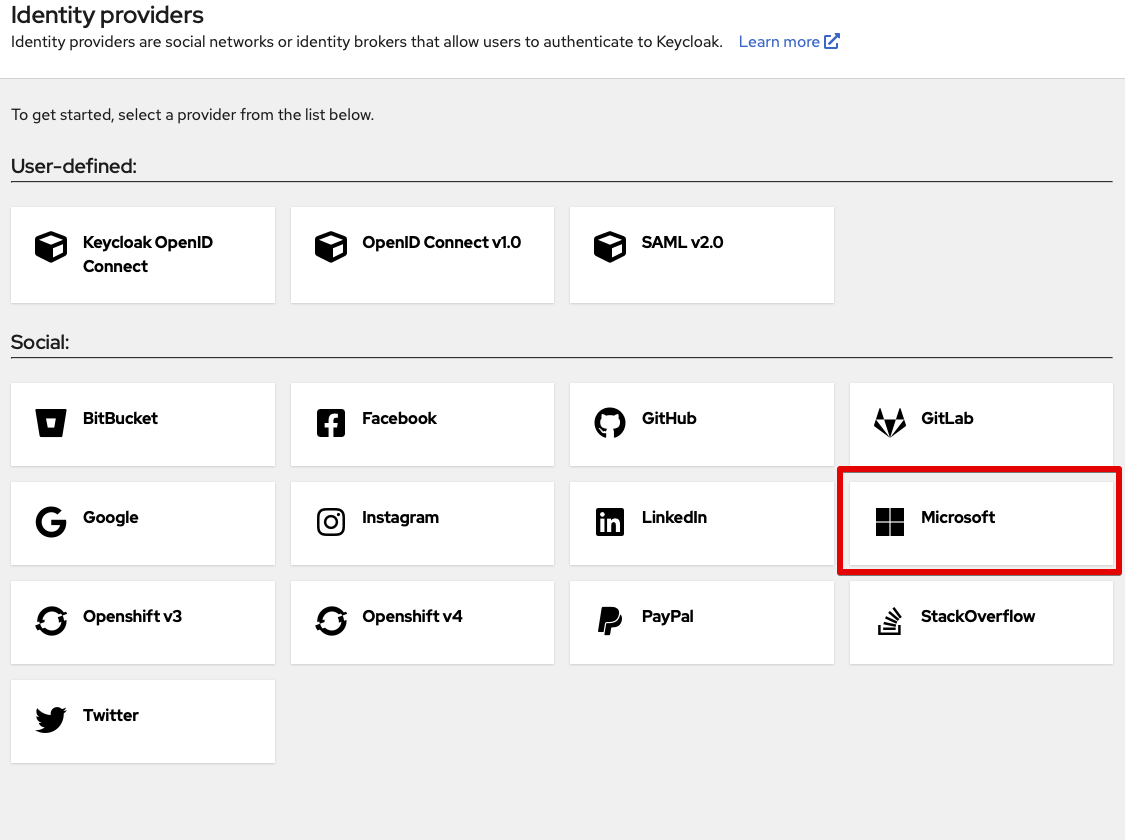
Next, we add Entra as an identity provider; in the left menu, go to Identity providers.
Select Microsoft.
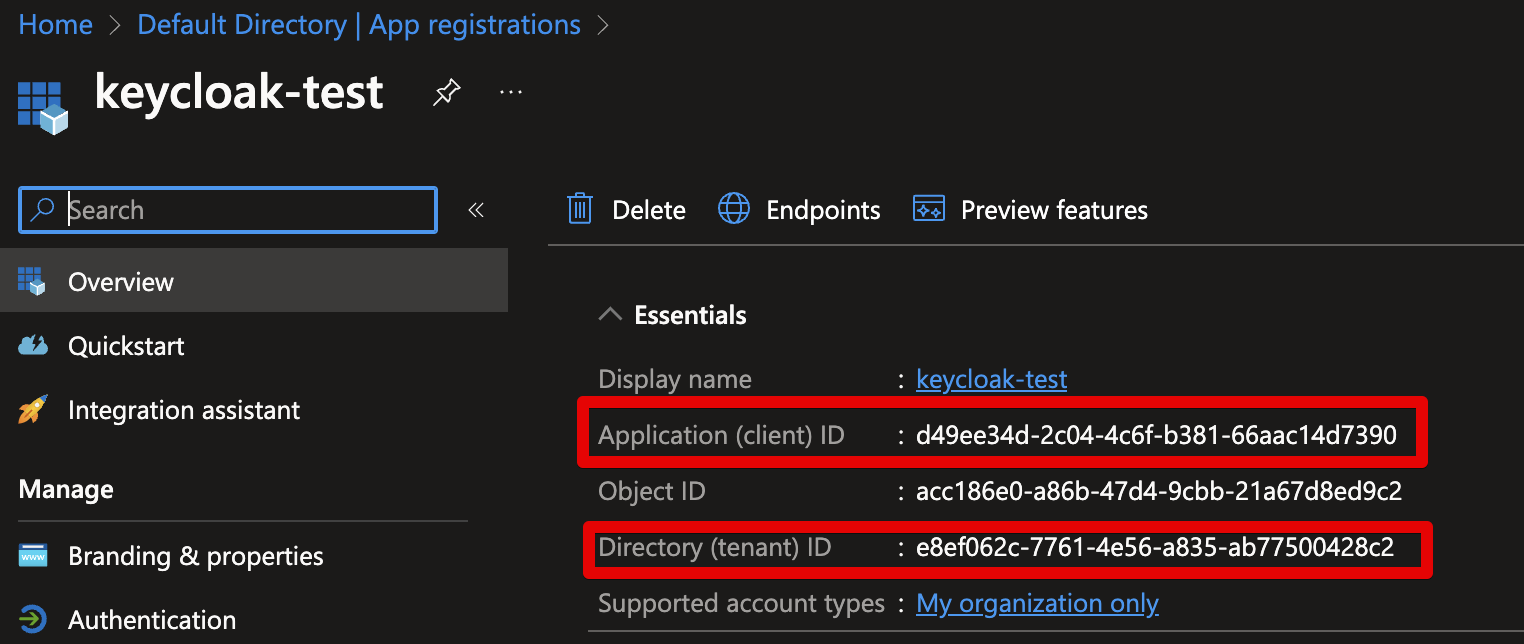
Fill in the App registrion details in our Microsoft provider, which we can copy from our Azure Entra tab (that should still be open):
- Client Secret: copy the secret's
Value
Next, go back to the overview page:
- Client ID: copy the
Application (client) IDvalue - Tenant ID: copy the
Directory (tenant) IDvalue
Note
If you hover over the text, you'll see a "copy" button that allows you to copy the value to your clipboard.
Verify the details, hit the Add button, and copy the Redirect URI.
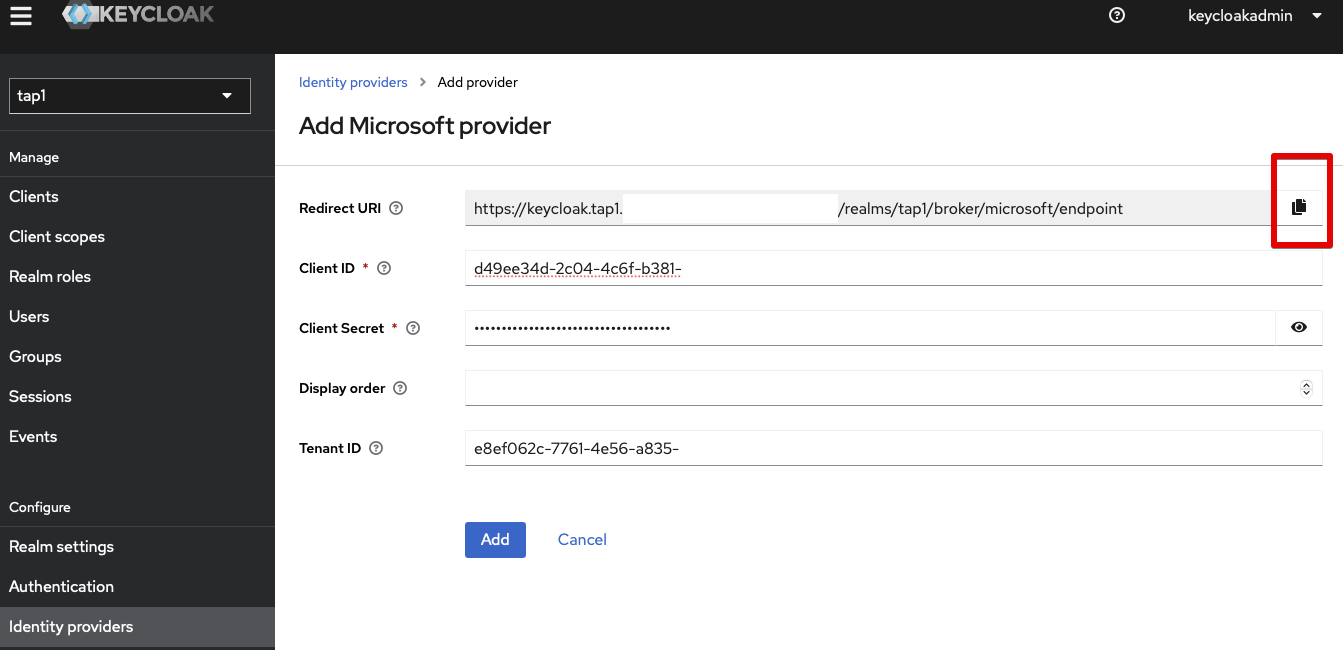
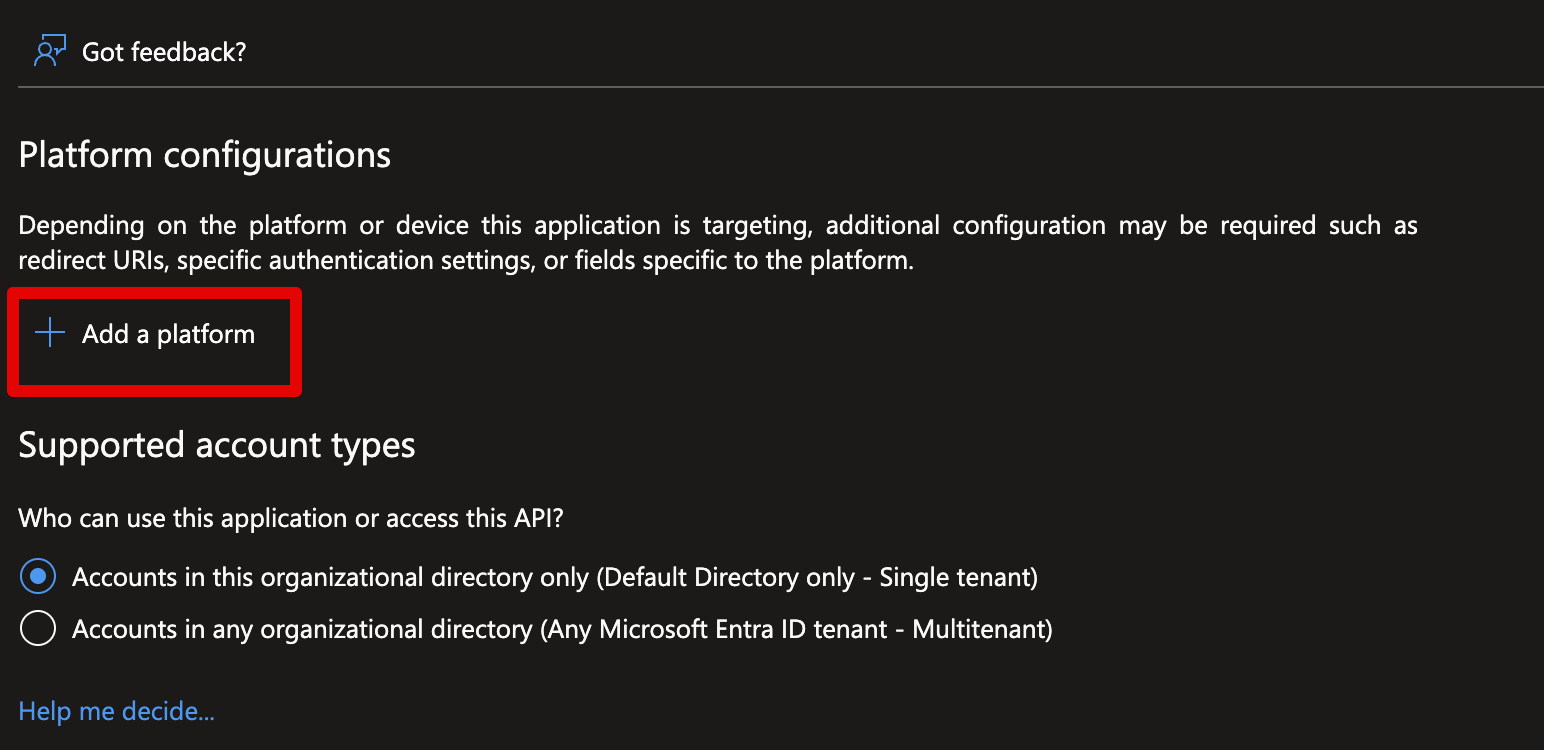
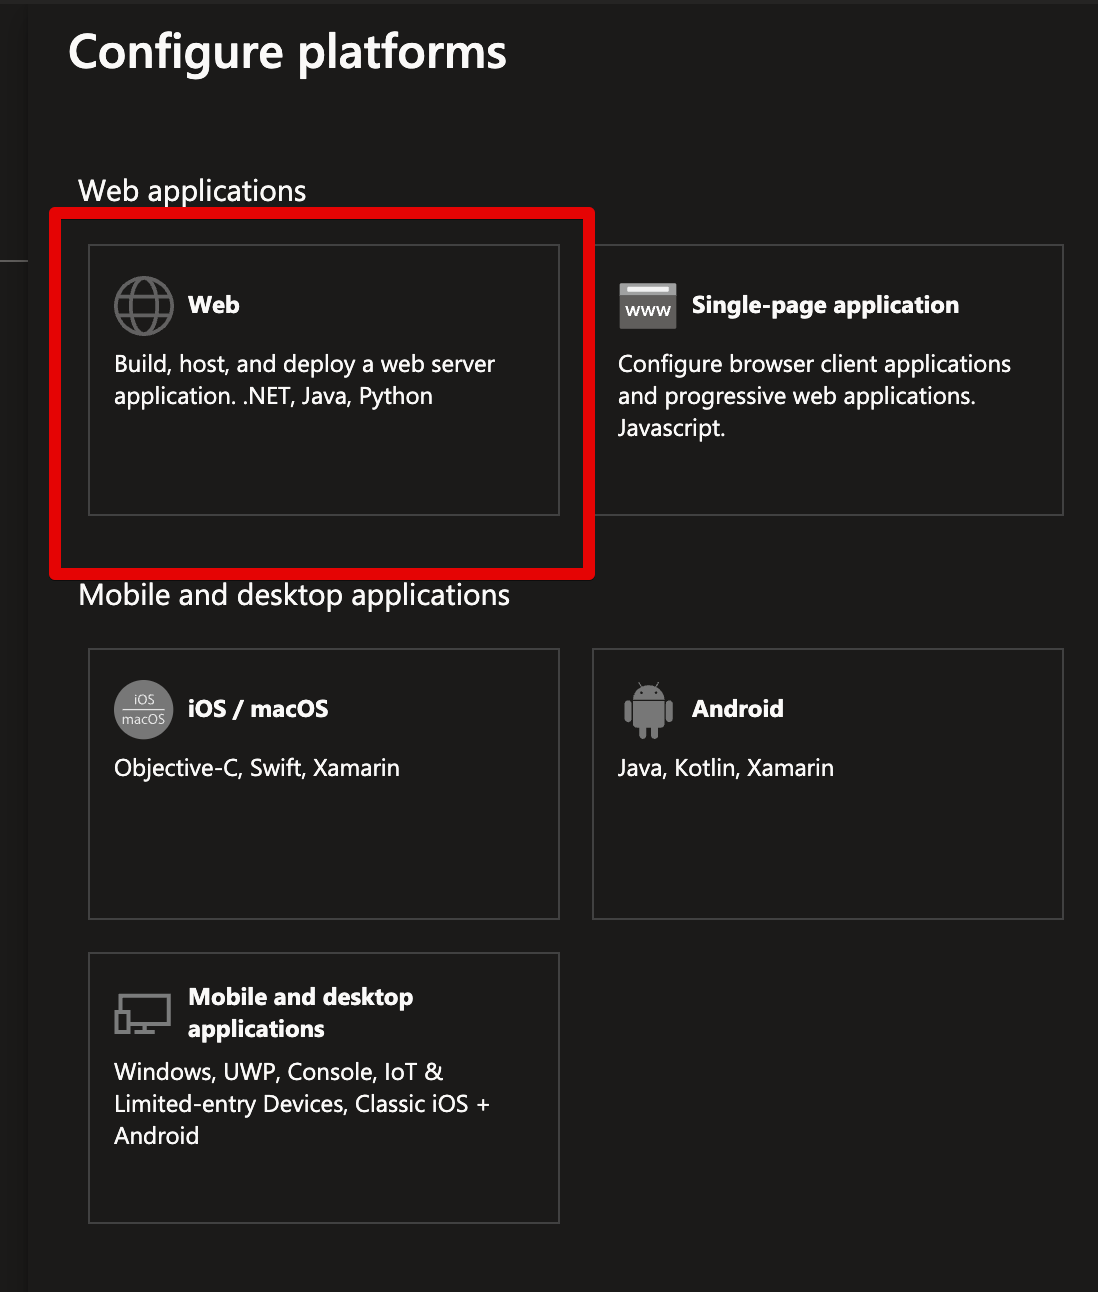
In Azure, we go to the Overview page (of the App registration) and click the Add redirect URI link behind the Redirect URIs header.
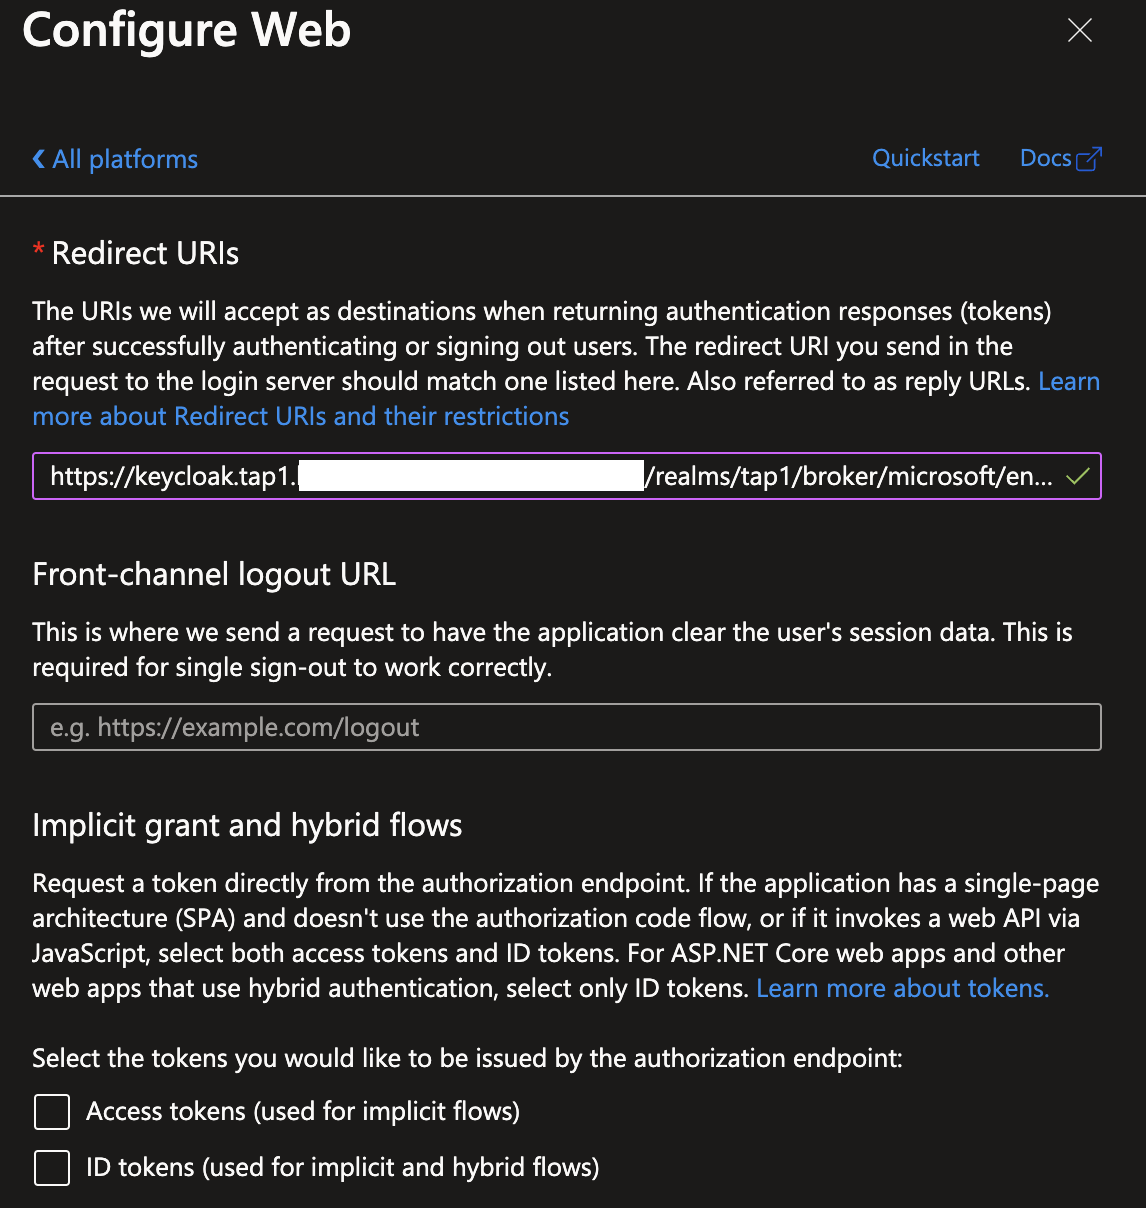
We add a web platform URI and paste it into the redirect URI from Keycloak.
Which should look something like this: https://keycloak.example.com/realms/tap/broker/microsoft/endpoint
Create TAP Client In Keycloak
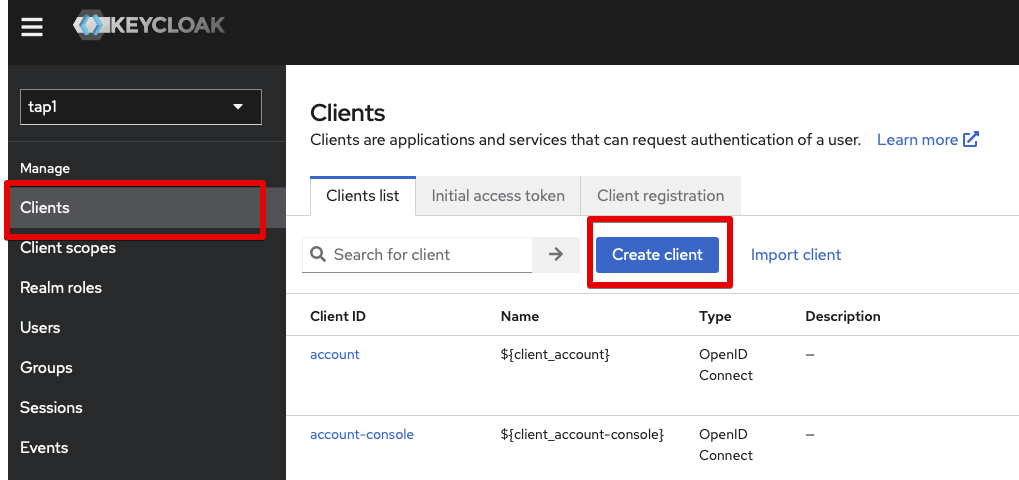
Go to Clients and hit Create client:

- Client type:
OpenID Connect - Client ID:
tap - Name:
Tanzu Application Platform
Next page (2):
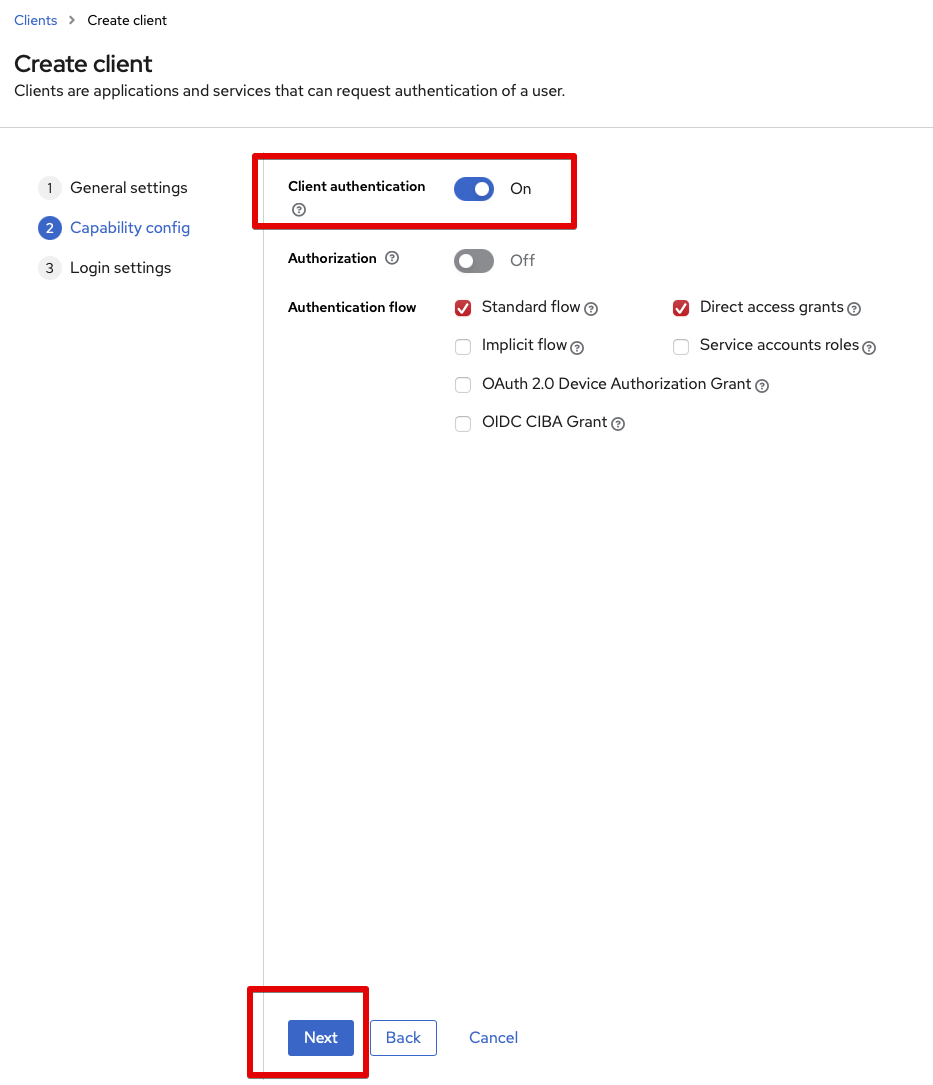
- Client authentication: togle to
On
Next page (3):
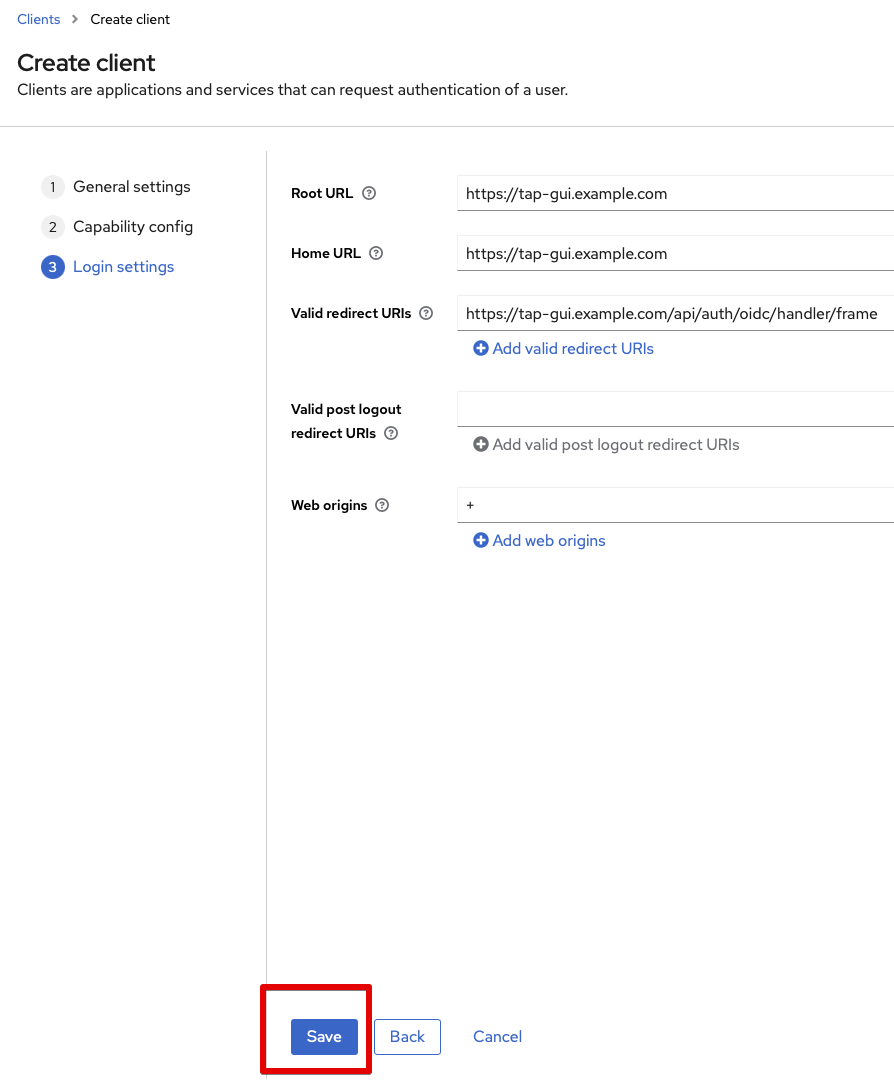
- Root URL: set this to TAP GUI root, e.g.,
https://tap-gui.example.com - Home URL: same
- Valid redirect URLs:
https://tap-gui.example.com/api/auth/oidc/handler/frame - Valid post logout redirect URIs: "
- Web origins:
+
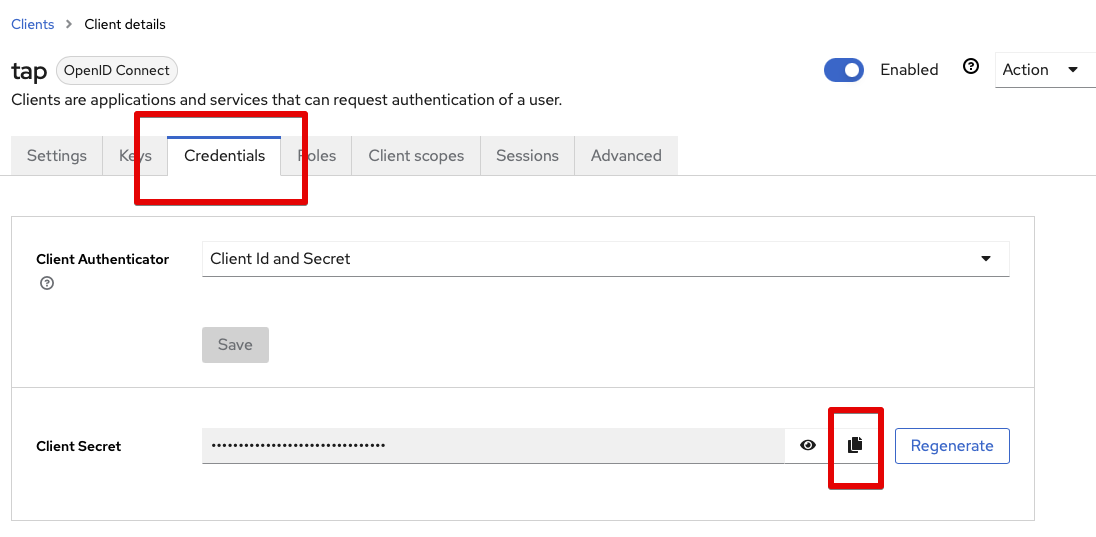
Go to Credentials tab, and copy the Client Secret to use in the TAP GUI config.
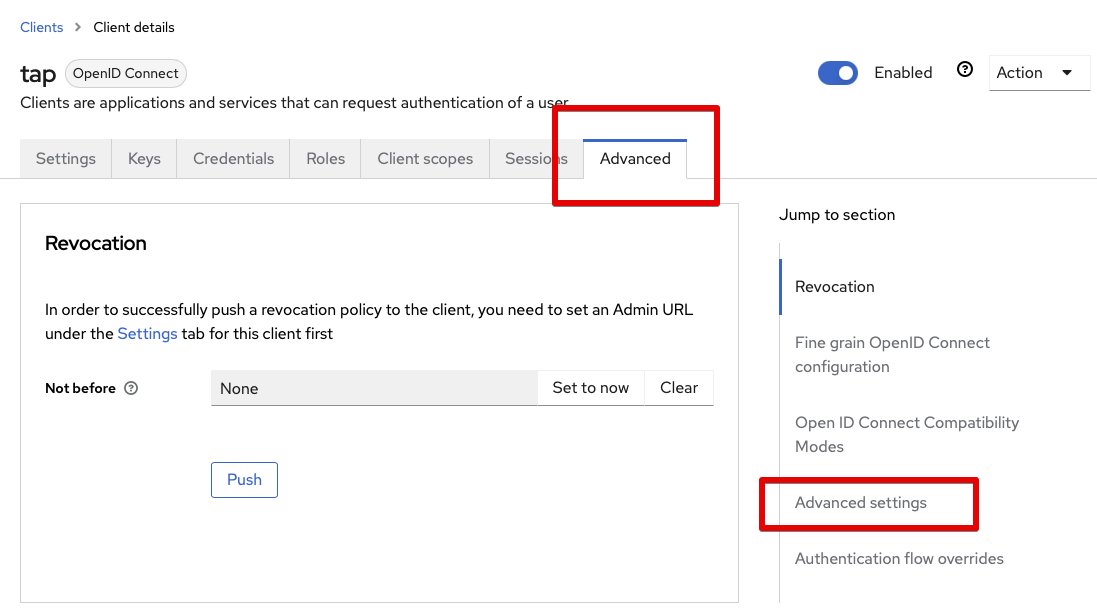
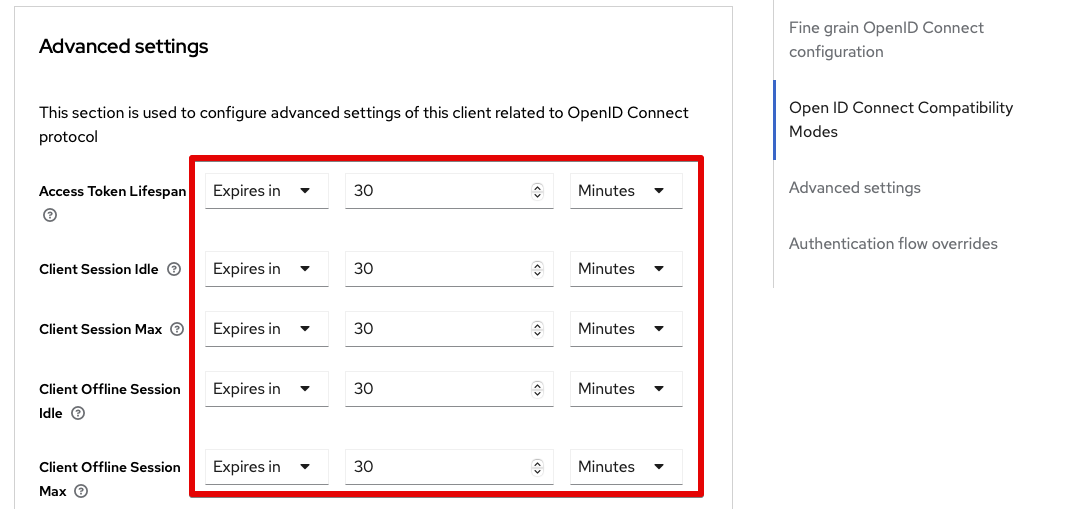
Then go to the Advanced tab and scroll to the Advanced settings section.
Here we update all the timeouts to 30 Minutes. Select the Expires in in the dropdown, and then set the timer.
There are some reports of the defaults here causing problems with some of the views in TAP GUI. It is best to set this to 15 minutes or longer to combat this.
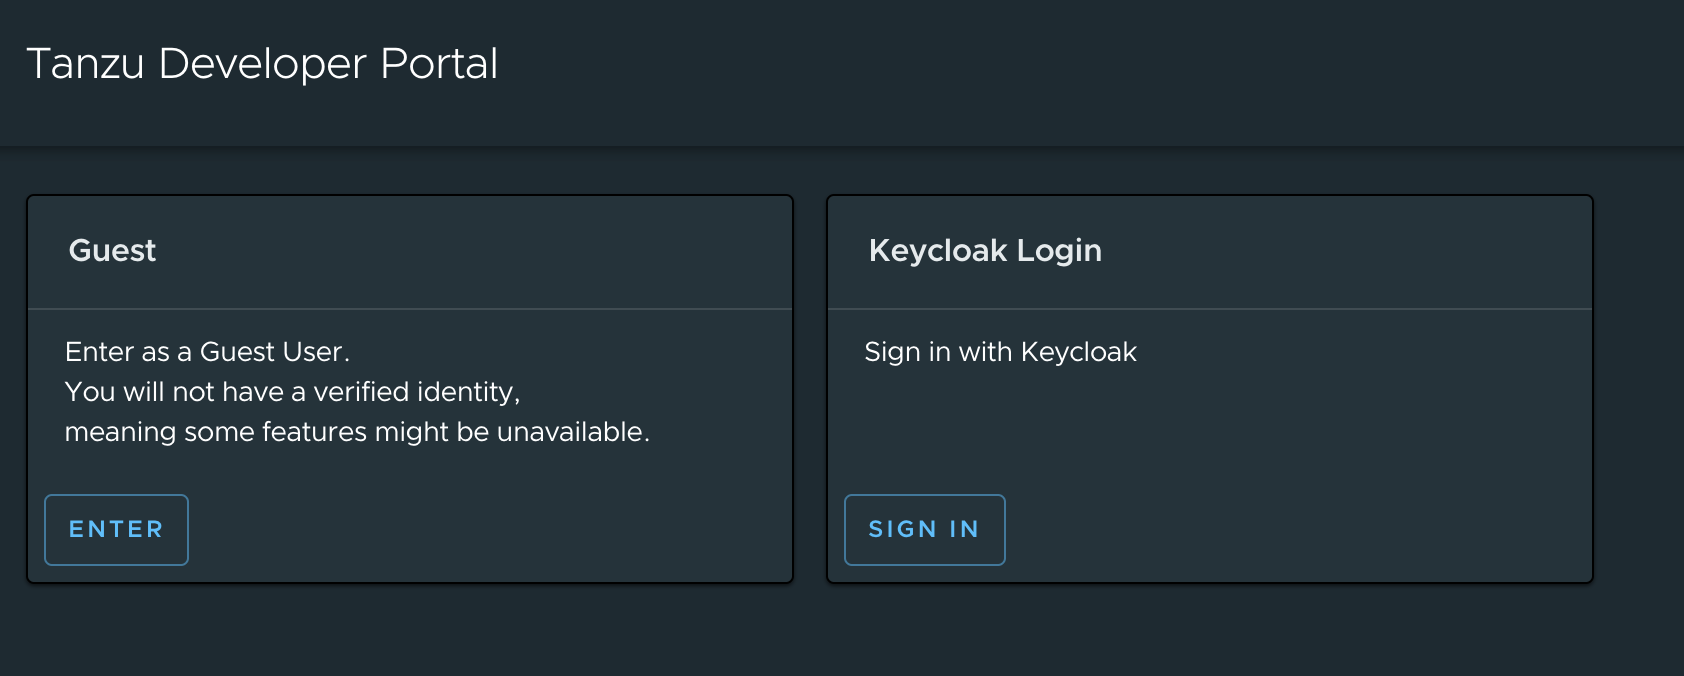
Configure TAP GUI
Now we can configure TAP GUI to use our OIDC Client10, by setting the auth values in the tap_gui.app_config property:
tap_gui:
  app_config:
    auth:
      allowGuestAccess: true
      environment: development
      loginPage:
        oidc:
          message: Sign in with Keycloak
          title: Keycloak Login
      providers:
        oidc:
          development:
            clientId: tap
            clientSecret: ???
            metadataUrl: ???
            prompt: auto
            scope: openid profile email offline_access
      session:
        secret: ???
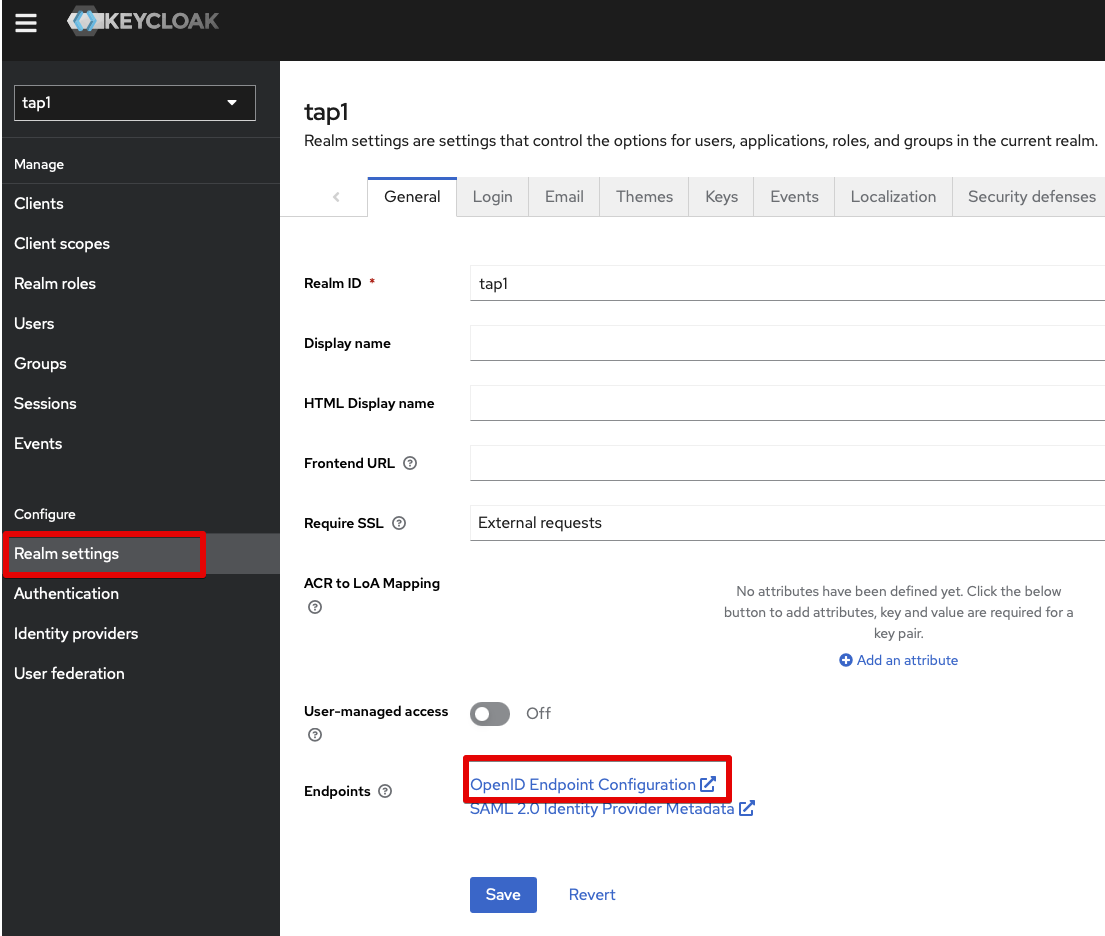
Replace the metadataUrl with your Keycloak realm's metadata URL, which should be something like https://keycloak.example.com/realms/tap/.well-known/openid-configuration.
You can collect it from the menu item Realm settings, the tab General, and then the link called OpenID Endpoint Configuration after the header Endpoints.
Replace the clientSecret with the Keycloak Client credential secret we copied earlier.
And replace the session.secret value with a randomly generated value, such as Y2MAACjPlZHPK8NhHMdf24g2mnBwcFgap01Mx.
Once you've updated the TAP install and the TAP GUI application is reloaded, you should see Keycloak as an option to log in: